Horticulture Guruji
Exercise 3
To study the layout and planting of orchard
The arrangement of plants in the orchard is known as lay-out. The following points need to be considered before choosing a system of planting.
- It should accommodate the maximum number of plants per unit area.
- It should allow sufficient space for the development of each tree.
- It enables equal distribution of the area under each tree.
- Intercultural operations such as ploughing, spraying, etc. are easily carried out.
- It makes supervision more easy and effective.
Systems of Orchard Layout
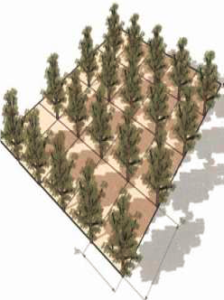
1) Square system:
|
 |
Procedure for layout:
|
Step no. –1: ABCD‖ is the area where the trees are to be planted. The first step will be establishing a baseline. Select the baseline parallel to the road or fence or the boundary of the orchard. This should be drawn at half a distance of the spacing that is to be followed. For example, if the spacing is 10m, the baseline should be drawn at a distance of 5m from the periphery of the plot. |
 |
Step no.-2: Towards the end of the baselines leave again a gap of half the spacing from the boundary or road or fence etc. and put the peg on one end of the baseline. From this peg measure one planting distance and put the second peg on the baseline.
Thus, continue placing pegs at each of the planting distances till the total length of the baseline is covered. The distance from the last peg to the boundary should also be at half the spacing.
Step no.-3: From the first peg and the last peg on the baseline, draw perpendicular lines.
The perpendicular lines may be drawn by adopting the following method.
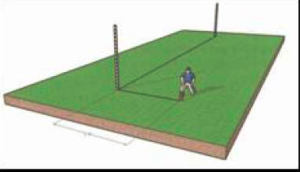
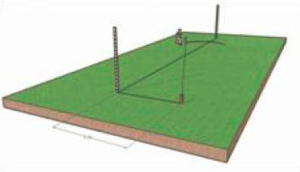
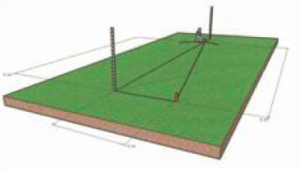
Pythagoras theorem method: Adopting a right-angled triangle with the sides and hypotenuse in the proportions of 3:4:5, a perpendicular line can be drawn.
|
· On the baseline from the first peg measure a known distance in the proportion of 3 and mark the point · From the first peg, measure a distance in the proportion of 4 and draw an arc away from the baseline. |
 |
|
· From the point previously marked on the baseline now measure a distance in the proportion of 5 and draw a second arc intercepting the first one. |
 |
|
· Now extend a straight line from the position of the first peg through the point of intersection of the two arcs. This gives a perpendicular line to the baseline from the position of the first peg. |
 |
Merits and demerits:
1) Most commonly followed and simplest of all and easy to layout.
2) The possibility of cultural operations in two directions is the greatest advantage of this system.
3) The major disadvantage of this system is that a lot of space in the centre of each square is wasted.
2) Rectangular system:
|
Ø Similar to the square system, except that the distance between plants in the row and the distance between rows is not the same but different. Ø Row to row distance is more than that from plant to plant in the row. |
 |
Procedure for layout:
Step no‘s: 1, 2, and 3 are as same as in the square system.
Step no.4: Mark the planting positions on both the perpendicular lines following the spacing to be adopted between the rows.
Step no.5: It is the same as in the square system, but following the spacing to be adjusted between the rows.
Merits and demerits:
- It has almost all the advantages of the square system but cultivation is somewhat difficult, especially when the trees have fully grown.
3) Quincunx or filler system:
|
o This is also known as filler or diagonal system. o This is the modification of a square system of layout distinguished to make use of the empty space in the center of each square by planting another plant is called filler tree. Generally, the filler tree will be the precocious and shorter duration and not be of the same kind as those planted on the corner of the square. Guava, phalsa. plum, papaya, peaches, kinnow are important fillers. They yield some crop before the permanent trees come into bearing. o The filler tree is removed when the main fruit trees grow to full stature and start bearing. |
 |
This system is followed when the distance between permanent trees exceeds 8m or more or where permanent trees are very slow in their growth and also take a longer time for coming to bearing. Eg. Sapota, Jackfruit.
Procedure for layout:
Step no-1: Layout the square system
Step no.-2: Draw diagonals of each square.
Step no.-3: Mark the planting position of the filler tree by fixing a peg at the point of intersection of the two diagonals in each square.
Merits and demerits:
- The main advantage of this system is that the plant population is about to double than the square system.
- The greatest disadvantage of this system is that it is difficult to carry out intercultural operations on account of the filler tree.
4) Hexagonal system:
|
 |
Procedure for layout: Steps-
- Mark the four sides as in the case of a square system with the distances shown in the sketch. Locate the positions of the plants also on the first row.
- Take a rope slightly more in length than double the distance between the plants.
- Put a knot in the centre, so that the length of the rope on either side of the knot is as much as the tree to tree distance or
- Take an iron chain with a ring in the centre and either arm equal in length to the tree to tree distance.
- Hold the ends of the rope or chain, each at the positions of two consecutive plants on the first row, and stretch from the centre to give an equilateral triangle, and thereby the position of a plant on the second row is fixed.
- In this way, the field can be laid out.
Merits and demerits:
- This system permits cultivation in three directions.
- The plants occupy the land fully without any waste as in square system
- This system allows 15% more plants than the square system of planting.
- This system is not generally followed because it is difficult to adopt in practice in the field and the inter-cultivation in such gardens is difficult to carry out.
